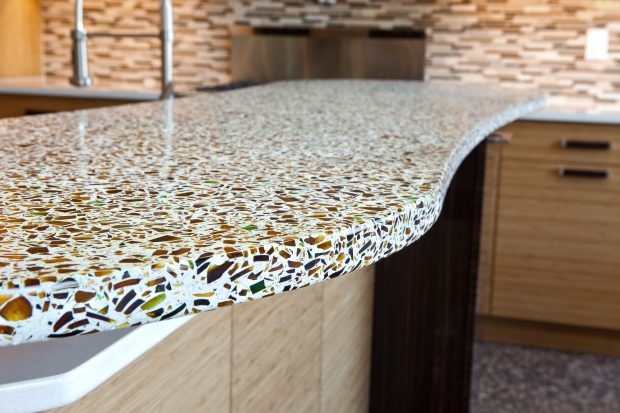
Most homeowners love blending aesthetics and functionalism when it comes to countertops. Many modern households have already developed a liking for recycled glass countertops. These countertops’ longevity, aesthetic appeal, and versatility make them a popular integration into modern kitchens. This article discusses the DIY process of manufacturing countertops for your kitchen from recycled glass.
Before proceeding with your countertop designing process, it would be logical to consult the experts at Caesarstone. Professional guidance regarding the design and visual elements would help you elicit optimal visual pleasure from these installations.

Type Of Support In Recycled Glass Countertops
Depending on the available space in your kitchen, you can choose from two types of support for your countertop. Firstly, you can go for the anchored support to securely fix the frame at the wall studs. These studs should be present at the bottom, middle, and top.
Another type of support involves mounding the countertop on a steel frame. You need not have any cabinets under the installation. In the process, you can store oversized items under the countertop. Make sure that the support is stable, flat, securely anchored, strong, and level. In the process, they would be able to carry a heavy load.
How To Make Recycled Glass Countertops?
Here is all you need to do to make recycled glass countertops for your kitchen.
Building The Form
You would need an adhesive element and a simple form rail to make a recycled glass countertop in just an hour. Firstly, use a melamine board to form the foundation. Cut it from the base so that you can prepare a wall out of it. For kitchen countertops, this should be around 1 inch. Cut the access form using a hand saw from the top.
Attaching Form Base to Form Walls
Now attach the bottom of the form walls to a double stick carpet tape. Make sure that the form walls remain pressed to the board at the base, and keep it straight. Once done, cut the form liners to one inch, considering that the average liners come in a 2-inch width. In case you notice any gap around the corners, use silicone to fill it up when you seal the mold.
Gluing Form Walls To Wall Liners
The surface of the wall liners would be smooth and shiny on one side. On the other side, it would have a matte finish. Spray adhesive on the shiny surface, and leave it for a while to dry. Attach liners at the top of the wall. You might count on the straight factory edge to make sure that the countertop is straight. Use a silicone sealant on the top of the wall laterally so that the concrete does not run among the wall liners and form a wall.
Sealing And Leveling The Form
While sealing the form, you may make the edges round to enhance their looks. The gaps need to be filled in the base and corners to make it watertight. Eliminate silicone residues by using denatured alcohol. Make sure that the form has an even thickness throughout the casting process.
Mixing Pigments And Adding Terrazzo Mix
Next, you need to mix pigments and liquid modifiers in the recycled glass countertops. Make sure to put on a mask and gloves while you mix these elements. Take a 15-gallon bucket and pour the liquid modifier into it. Now add a bagful of the desired pigment into the liquid modifier. After you blend it well, add 1/3 bag of Terrazzo Mix into the solution. Make sure that the concrete mixture does not form lumps and blends thoroughly. To ensure smoothness, scrap the mixture along the edges or sides.
Next, you need to add the aggregate of recycled glass into the mixture. Use a paddle mixer to blend it well, and continue the process till you evenly mix the glass. You might add a few cups of water into the mixture to make it semi-pourable.
Casting The Countertop
Put on heavy-duty rubber gloves while casting the mix, as the crushed glass may make its way through ordinary gloves. The process is similar to casting concrete. However, you need extra care to handle the glass aggregate.
The casting table should be attached to a vibrator. On each side of the table, there should be two table vibrators. Place the casting table indoors under a shade. Connect the table vibrator using long screws to a variable speed controller. Now plug the controller into the outlet on the wall, and the vibrators into the controller. In the process, you can examine whether or not the appliances are performing in the right way.
Pouring Concrete And Grinding
Spread the concrete or cement mixture using a bucket across the surface. Make sure that they reach all the corners evenly. Next, the concrete in the form needs to be flattened. You would require grinders to carry out this process. The edges at the front and the bottom need to be ground to get them flattened. This would make it straight and consistent.
Before remodeling, you can easily get the countertop recycled. Take care that cracks do not develop during the installation, as this stage is a critical one. When you remove the countertop from the mold, the support should be applied at a distance of 12 inches.
Removing Form Walls, Polishing, And Sealing
Now peel the countertop from the walls and place them by the side. Before flipping over, scratch the rough concrete edges using diamond hand pads. Polishing the recycled glass countertop may take time, and you might use a dry or wet polisher for this purpose.
Use a sealer that can significantly enhance the gloss to elicit the boldest shade in the glass countertop. Experts recommend applying double coats of the sealer for better performance and protection.
Endnote
The best thing about recycled glass countertops is the ability to get them customized as per your aesthetics. Once you have a consultation with the experts, you can refine your design ideas. In the process, you can benefit from an appealing interior in your kitchen.
Alternatively, you can reach out to reputed manufacturers and customize your recycled glass countertop.


